
Contents
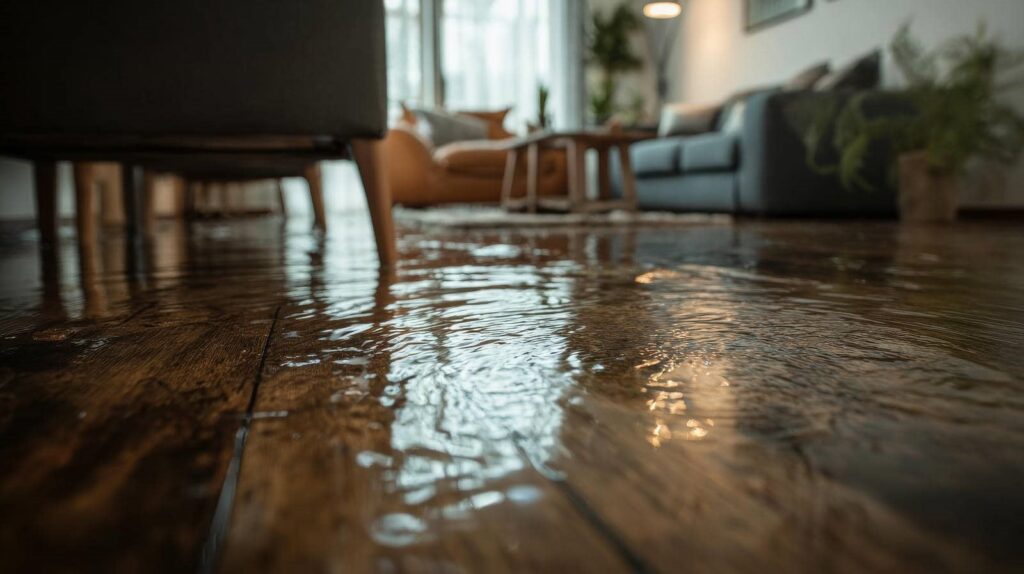
Did you know that water damage accounts for nearly 20% of all homeowners’ insurance claims? If you’re facing this issue, it can be overwhelming, especially when you’re on a budget. However, there are practical, cost-effective fixes you can implement to restore your space. From identifying the source of the damage to choosing the right materials, knowing your options can make a significant difference. Let’s explore some essential steps to tackle this challenge effectively.
Key Takeaways
- Use moisture-resistant drywall for repairs, as it’s affordable and effective against water damage in walls.
- Apply waterproof sealants to vulnerable areas to protect against future water damage.
- Consider DIY patching techniques for walls, which can save on labor costs.
- Install budget-friendly flooring options like laminate or vinyl to replace damaged sections.
- Utilize a wet/dry vacuum to remove standing water quickly and prevent further issues.
Assessing Water Damage: Your First Step to Recovery
When you discover water damage in your home, evaluating the situation promptly is essential for effective recovery. Start with a thorough water damage assessment. Check for wet spots on walls, ceilings, and floors. Use a moisture meter if you have one, as it provides accurate readings. Document everything with photos; this will help you in discussions with insurance later.
Next, identify the source of the damage, even if you’re not fixing it yet. Understanding where the water’s coming from is vital for your recovery strategies.
Consider the extent of the damage—are you dealing with minor stains or significant structural issues? Prioritize your needs based on this assessment, and remember, early action can save you time and money in the long run.
Stop the Source: Fix Leaks and Burst Pipes
To stop water damage, you need to identify the sources of leaks and burst pipes in your home.
Start by checking areas like under sinks, around appliances, and along walls for any signs of moisture.
Once you find the problem, either repair or replace the affected pipes to prevent further issues.
Identify Leak Sources
Identifying leak sources is essential for effective water damage repair, and it can save you from costly repairs down the line.
Start by inspecting common leak sources like under sinks, around toilets, and in basements. Use simple leak detection methods, such as checking your water meter or looking for wet spots on walls and ceilings.
Don’t overlook areas behind appliances, where hoses may wear out. If you notice a sudden spike in your water bill, it might indicate a hidden leak.
Repair or Replace Pipes
Fixing leaks and burst pipes is an important step in preventing further water damage.
Whether you’re a seasoned DIYer or new to home repairs, addressing these issues can save you money in the long run.
Here are three steps to take into account:
- Inspect Regularly: Keep an eye on your pipes, especially in high-risk areas.
Regular pipe maintenance can help catch problems before they escalate.
Seal Minor Leaks: For small leaks, use pipe sealant or tape as a budget repair before contemplating more extensive measures.
Replace Damaged Sections: If you notice significant wear or corrosion, replacing the affected sections is crucial.
Investing in quality materials now can prevent future headaches.
Taking these steps guarantees your home stays safe and dry, fostering a sense of belonging and comfort.
Gather Essential Tools for DIY Repair
Before you start your water damage repairs, it’s essential to gather the right tools.
You’ll need a basic toolkit that includes a hammer, screwdrivers, and a utility knife, along with safety gear like gloves and goggles to protect yourself.
Having these essentials on hand will make your DIY project smoother and safer.
Basic Tools Checklist
When tackling water damage repairs, having the right tools at hand can make all the difference. To guarantee you’re prepared, here’s a basic checklist of essential tool types that’ll help you get the job done efficiently.
Remember these tool selection tips as you gather your supplies:
Utility Knife: Perfect for cutting materials and removing damaged sections.
Moisture Meter: Essential for locating hidden water damage and guaranteeing your repairs are effective.
Wet/Dry Vacuum: A must-have for removing standing water and drying out affected areas.
These tools won’t only simplify your repair process but also give you confidence as you restore your space.
With the right equipment, you’ll feel empowered to tackle any water damage challenge!
Safety Equipment Essentials
While diving into water damage repairs can seem intimidating, prioritizing safety equipment is essential for ensuring your well-being throughout the process.
Start by investing in basic safety gear, like gloves and goggles, to protect your hands and eyes from harmful substances. A sturdy mask helps filter out dust and mold spores, keeping your lungs safe.
Non-slip boots are vital for traversing wet areas without risking slips and falls. If you’re working with electrical components, a voltage tester is a must for personal protection.
Don’t forget to have a first aid kit handy—just in case. By equipping yourself with the right safety gear, you’ll not only feel more confident but also create a safer environment for yourself and those around you.
Water Damage Drying Techniques: Effective Methods
As soon as you notice water damage, it’s crucial to act quickly to prevent further issues, and employing effective drying techniques can make all the difference.
Here are three methods you can use:
Use Dehumidifiers: Boost dehumidifier efficiency by placing it in the affected area. This helps draw out moisture from the air and materials.
Ventilation: Open windows and doors to promote airflow. Fans can also help circulate air, aiding in faster evaporation.
Moisture Detection: Use a moisture meter to pinpoint damp spots. This guarantees you address all areas needing attention.
How to Patch and Repaint Your Walls After Water Damage
After addressing the drying process, it’s time to assess your wall damage and determine the best patching techniques.
You’ll want to choose the right materials to guarantee a smooth finish before repainting.
Selecting the right paint won’t only enhance the look but also help protect against future water issues.
Assessing Wall Damage
When tackling water damage, the first step is evaluating the extent of the wall damage. You want to guarantee wall stability while checking for any signs of mold. Here’s how to get started:
Inspect for Mold: Look for discoloration or a musty smell, which can indicate mold growth. A thorough mold assessment is essential before proceeding.
Check for Soft Spots: Gently press on the walls to identify any soft or crumbling areas, which may signal structural issues.
Assess Water Entry Points: Pinpoint where the water came from, whether it’s a leak, flooding, or humidity, to prevent future damage.
Taking these steps will help you understand your repair needs and guide your next actions.
Patching Techniques Explained
To effectively restore your walls after water damage, you’ll need to master several patching techniques that guarantee a smooth finish.
Start with drywall patching for any holes or damaged sections. Use appropriate adhesive options to secure patches, ensuring strong bonds.
For ceiling repair, apply sealing techniques to prevent future moisture issues. Once patched, focus on texture matching to blend seamlessly with your existing walls.
After drying, employ paint blending strategies to achieve a uniform look. Don’t forget to install moisture barriers to protect against future damage.
If insulation has been affected, use insulation methods that suit your space.
Choosing Paint Wisely
How can you guarantee your freshly patched walls look great and last long? Choosing the right paint is essential. Here are three key factors to evaluate:
Eco-Friendly Options: Look for low-VOC or zero-VOC paints. They’re better for the environment and your indoor air quality.
Color Selection: Pick a color that complements your space, but also reflect on how it’ll hide imperfections.
Lighter shades can brighten a room, while darker tones add depth.
- Finish Type: Satin or eggshell finishes are often best for repair jobs, as they balance durability and aesthetics.
Budget-Friendly Flooring Repairs
If you’ve experienced water damage, addressing flooring repairs quickly can save you money and prevent further issues.
Start by evaluating the damage and determining what can be salvaged. For affordable flooring options, consider laminate or vinyl, which aren’t only budget-friendly but also resistant to moisture.
If you’re feeling handy, DIY flooring solutions like peel-and-stick tiles can be a fun project. Just make sure the subfloor is dry and level before installation.
You can also replace only the damaged sections instead of the entire floor, keeping costs down.
Prevent and Remove Mold Growth
Since water damage can create the perfect environment for mold growth, it’s crucial to act swiftly to prevent and remove it.
Here are three effective mold prevention strategies you can implement:
Control Humidity: Keep indoor humidity below 50% using dehumidifiers and proper ventilation.
Inspect Regularly: Check areas prone to moisture, like bathrooms and basements, for signs of mold. Early detection is key.
Use Effective Cleaning Solutions: Clean surfaces with a mixture of water and vinegar or a commercial mold cleaner to eliminate spores.
How to Insulate Areas Affected by Water Damage
When dealing with areas affected by water damage, proper insulation is essential to prevent further issues like heat loss and moisture retention.
Start by removing any damaged insulation materials, ensuring everything is dry. Consider using fiberglass batts or foam boards, as they’re affordable and effective.
After laying down the insulation, install moisture barriers to shield against future leaks. These barriers help redirect water away and keep your insulation intact.
Make sure to seal any gaps or seams with tape or spray foam to enhance efficiency.
By taking these steps, you’ll create a more comfortable living space while protecting your home from the lingering effects of water damage.
Choosing Affordable Repair Materials
Although water damage can be intimidating, choosing affordable repair materials can greatly ease the burden on your budget.
You don’t have to sacrifice quality for cost—there are plenty of inexpensive materials and alternative solutions available. Here are three options to contemplate:
Plywood: A strong, inexpensive choice for replacing damaged flooring or wall sections.
Drywall: Affordable and easy to install, it’s perfect for repairing water-damaged walls.
Sealants: Use waterproof sealants to protect vulnerable areas from future damage.
When to Call a Professional for Help?
Recognizing the signs of severe water damage can be essential, especially when deciding whether to tackle the repairs yourself or call in a professional.
If you notice significant mold growth, structural damage, or persistent leaks, it’s time to seek professional consultation.
Don’t underestimate the dangers; water damage can lead to health issues and more extensive repairs if left untreated.
If the problem is extensive or involves multiple areas, consider contacting emergency services. They can assess the situation quickly and provide the necessary expertise to prevent further damage.
Remember, it’s better to invest in a professional’s help than to risk costly repairs down the line.
Knowing when to call for help can save you time, money, and stress in the long run.
Frequently Asked Questions
Can I Use a Regular Vacuum to Remove Water?
No, you shouldn’t use a regular vacuum for water extraction. Instead, opt for a wet/dry vacuum, designed for such tasks. It effectively handles liquid, preventing damage to your equipment and ensuring efficient cleanup.
How Long Does It Take for Water-Damaged Areas to Dry?
Water-damaged areas usually take 24 to 48 hours to dry, depending on factors like airflow and humidity. Conduct a moisture assessment to gauge progress and verify you’re on track for effective drying.
Will Homeowners Insurance Cover Water Damage Repairs?
Your homeowners insurance might just have your back! However, check your insurance policy for specific coverage limits. Some types of water damage may be excluded, so it’s wise to understand the fine print.
What Are the Signs of Hidden Water Damage?
You’ll notice signs of hidden water damage through mold growth, musty odors, or water stains on walls and ceilings. Look for peeling paint or warped floors, which often indicate hidden leaks lurking beneath the surface.
Can I Reuse Soaked Insulation After Drying?
You shouldn’t reuse soaked insulation after drying. Even if it seems fine, insulation safety concerns arise due to mold potential. Consider effective drying methods and prioritize replacing it to guarantee a safe, comfortable environment.
Wrap-Up
In the world of water damage repair, think of yourself as a gardener tending to a wilting plant. You’ve got to prune the damaged leaves, guarantee the roots get enough water, and provide the right nutrients to help it flourish again. Just as a little care can revive a struggling plant, your budget-friendly fixes can restore your home. Stay vigilant, act quickly, and don’t hesitate to call in the pros when needed. Your home deserves it!
Recent Posts
7 Quick Tips for Emergency Mold Cleanup
Did you know that mold can start growing within 24 to 48 hours after water
Top 10 Strategies for Storm Damage Cleanup
You might think that storm damage cleanup is just about picking up debris and moving
Mold Remediation Techniques After Storm Damage
After a storm, you’re likely to encounter mold growth due to increased moisture levels in